Plumbing Your House: A Comprehensive Guide
Plumbing is a critical component of modern homes, ensuring water delivery to fixtures and proper drainage of wastewater. Whether you’re building a new house or renovating an existing one, understanding the basics of residential plumbing can help you make informed decisions and ensure a smooth construction process. This guide explores the essentials of plumbing, the materials used, and the various stages involved.
Understanding Plumbing in Modern Homes
Plumbing systems in homes are intricate networks of pipes designed to supply clean water and dispose of wastewater efficiently. A well-designed plumbing system ensures functionality, safety, and compliance with local codes. Licensed plumbers play a crucial role in installing and maintaining these systems, adhering to strict guidelines to guarantee performance and safety.
Common Materials Used in Residential Plumbing
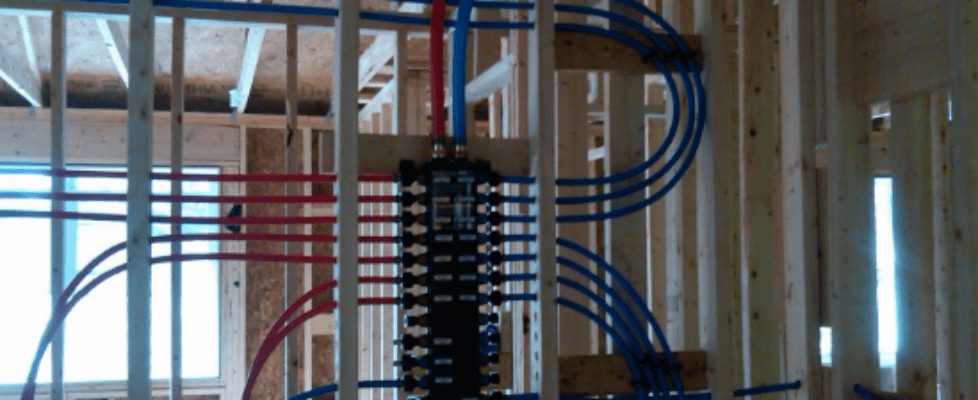
- PEX Piping:
- What It Is: A flexible plastic piping material available in various colors such as red, blue, white, and clear. Additional colors like orange, green, yellow, black, and grey may be used for specialized purposes.
- Advantages:
- Highly durable and resistant to freezing temperatures.
- Flexible, reducing the need for joints and fittings.
- Easy to install and maintain.
- ABS Drain Lines:
- What It Is: Acrylonitrile Butadiene Styrene (ABS) is a black plastic pipe commonly used for drainage.
- Advantages:
- Lightweight and easy to handle.
- Resistant to corrosion and chemical damage.
- Ideal for venting and carrying wastewater.
Stages of Plumbing a House
1. Rough-In Stage
The rough-in stage lays the groundwork for the plumbing system. This phase involves installing water supply and drainage pipes before walls and floors are completed.
Tasks Included:
- Groundwork:
- Install drainage pipes in the basement or crawl space.
- Place and connect vent pipes.
- Water Lines:
- Run PEX or copper pipes throughout the house.
- Connect pipes to fixtures such as bathtubs and shower faucets.
- Fixture Installation:
- Install and test bathtubs and shower units.
- Place sump pumps, if required, ensuring they are properly positioned and tested.
Testing During Rough-In:
- Perform an air test on water lines to check for leaks.
- Water-test drain lines where required by code.
- Seal clean-outs in the drainage system with silicone to prevent leaks. While these can be opened with a wrench later, silicone ensures they remain watertight during the construction phase.
2. Finish Plumbing
The finish plumbing stage occurs after the walls and ceilings are completed. This phase focuses on installing visible fixtures and ensuring the system is functional.
Tasks Included:
- Install sinks, toilets, and faucets.
- Connect water supply and drainage lines to fixtures.
- Complete work on bathtubs and showers.
- Install the water heater:
- Use three-quarter-inch copper pipes for hot and cold water lines up to three feet above the heater before transitioning to PEX.
- Connect the water heater to a manifold system if used, ensuring copper pipes run from the water meter to the manifold.
Final Checks:
- Ensure all fixtures are securely installed and free of leaks.
- Verify water pressure and flow at all points of use.
- Inspect the water heater for proper operation and safety compliance.
Tips for a Successful Plumbing Installation
- Hire a Licensed Plumber:
- Always work with professionals who are experienced and certified.
- A licensed plumber ensures compliance with local codes and standards.
- Test Before Closing Walls:
- Conduct air or water tests on all piping systems to identify and fix leaks before drywall installation.
- Check for proper sealing of clean-outs and connections.
- Plan for Future Maintenance:
- Ensure all shut-off valves are accessible.
- Label water supply lines and clean-outs for easier identification during repairs.
- Choose Quality Materials:
- Invest in high-quality pipes and fittings to reduce the risk of future issues.
- Consider using copper pipes in critical areas for enhanced durability.
Advanced Considerations for Plumbing Systems
Manifold Systems
Manifold plumbing systems simplify water distribution by using a central control panel. Benefits include:
- Individual control of water flow to different fixtures.
- Enhanced water pressure and reduced chances of leaks.
Energy-Efficient Water Heaters
When selecting a water heater, opt for energy-efficient models to save on utility bills. Tankless water heaters are an excellent choice for modern homes due to their efficiency and compact design.
Common Challenges and Solutions
1. Pipe Freezing
- Challenge: Pipes exposed to freezing temperatures can burst, causing significant damage.
- Solution: Insulate pipes in unheated areas and consider heat tape for additional protection.
2. Leaks in Clean-Outs
- Challenge: Improperly sealed clean-outs can lead to hidden leaks.
- Solution: Seal clean-outs with silicone during installation.
3. Water Pressure Issues
- Challenge: Low or inconsistent water pressure can affect system performance.
- Solution: Ensure proper sizing of supply pipes and check for blockages or leaks.
Conclusion
Plumbing a house requires careful planning, quality materials, and skilled workmanship. From the rough-in stage to the final installation of fixtures, each step is crucial to creating a reliable and efficient plumbing system. By hiring experienced professionals and following best practices, you can ensure that your home’s plumbing system meets your needs and stands the test of time.


